How to Digitize Paper Documents and Go Paperless
Learning how to digitize your paper documents is the first real step toward getting rid of office clutter for good. It's about more than just a clean desk; it’s about building a smart, secure digital filing system that actually works for you. The basic idea is simple: scan your papers, use software to make the text searchable, and organize everything so you can find what you need in seconds.
Why Is Paper Still Haunting Modern Businesses?
Before we jump into the "how-to," let's get real about why those stacks of paper are such a problem. This isn't just about the cost of toner and paper reams. It’s about the silent, daily drag on your business operations that you might not even notice anymore.
I've seen it firsthand. An accounting team spends half a day hunting down a single missing invoice, delaying a crucial payment and putting a strain on a key vendor relationship. Or a procurement manager is stuck manually flipping through a mountain of paper proposals, wasting time they should be spending on strategic negotiations. These aren't made-up stories; they're the everyday reality in far too many companies.
The True Cost of Paper-Based Workflows
Relying on physical documents creates some serious risks and inefficiencies that are easy to underestimate. The problems go way beyond simple inconvenience—they can hit your bottom line and leave you trailing the competition.
Think about the real-world impact:
- Wasted Time: Your team is burning hours just looking for things. Every minute spent searching for a misfiled document is a minute not spent on their actual job.
- Sky-High Costs: It's not just printing. You're paying for storage space, filing cabinets, and the salaries of people whose job includes managing all that paper.
- Major Security Risks: A loose document on a desk is a data breach waiting to happen. Unsecured papers are an open invitation to theft, prying eyes, or even simple loss from a fire or water leak.
- Zero Flexibility: Paper files are stuck in one place. This makes remote work a nightmare and kills collaboration between different offices or teams on the go.
The numbers are pretty staggering. American businesses produce around 21 million tons of paper every year, and a shocking 7.5% of it gets lost completely. That lost paper comes with a hefty price tag—it costs about $120 just to find one misfiled document and a painful $220 to recreate one that's gone for good. If you want to dig deeper, Foxit’s blog has a great collection of document management stats.
Making the Business Case for Going Digital
Moving away from paper isn't just an IT upgrade; it's a fundamental business decision. And it's one that's becoming more urgent by the day. A well-known McKinsey report highlighted how the global pandemic has been driving digitization and automation at a breakneck pace. If you're not adapting, you're falling behind.
Learning how to digitize paper documents isn't about tidying up. It's about building a stronger, more efficient, and more competitive company that's ready for whatever comes next.
For a small law firm, going digital could mean pulling up any client file instantly during a court hearing. For a big manufacturing company, it could mean automating invoice processing to radically improve cash flow. The end goal is the same: turn that static, locked-away information into useful, active data that powers your business forward. We'll be focused on exactly how to do that throughout this guide.
Choosing the Right Digitization Toolkit
Before you scan a single page, let's talk about getting your setup right. I’ve seen countless projects get bogged down because they started with the wrong tools. Picking the right hardware and software from the get-go isn't just a small detail—it's the foundation for a smooth, efficient digital workflow.
The scanner you need is dictated entirely by what you plan to scan. You wouldn't use a push mower for a football field, and the same logic applies here.
Finding the Right Scanner for the Job
So, which scanner is right for you? It really comes down to the volume and type of documents you're dealing with every day.
For the heavy lifting—like mountains of vendor invoices or stacks of new-hire paperwork—a sheet-fed scanner is your best friend. These are the workhorses of the office, built to chew through 60-100 pages per minute. Their automatic document feeders (ADFs) can hold 50+ pages, letting you set it and forget it.
But what if you're handling delicate or non-standard items? That's where a flatbed scanner comes in. It’s perfect for fragile historical documents, bound books, or large-format items like blueprints that would get mangled in a feeder. It's slower, sure, but it gives you precision and protects your originals.
And for anyone working out in the field, don't sleep on modern mobile scanning apps. The cameras in today’s smartphones are so good that they often produce cleaner, more legible scans of receipts and signed forms than dedicated portable scanners from just a few years ago.
The decision to digitize paper documents directly impacts your business's efficiency, costs, and data security. Sticking with paper-based systems often leads to lost time and increased risks, while a digital workflow creates a clear competitive advantage.
This isn't just about tidying up the office. A smart digitization strategy directly impacts your bottom line by cutting down on wasted time and mitigating the risks that come with physical paper.

As you can see, the path away from paper is a strategic one, building a more resilient and agile operation from the ground up.
To make the choice clearer, here’s a quick breakdown of your main options.
Scanner Type Decision Guide
| Scanner Type | Best For | Pros | Cons |
|---|---|---|---|
| Sheet-Fed Scanner | High-volume office documents (invoices, contracts, forms) | Fast, efficient, handles large batches with an ADF | Can damage delicate originals; not for bound items |
| Flatbed Scanner | Delicate, old, or oversized items (photos, books, blueprints) | High-quality scans, safe for fragile documents | Slow, manual process (one page at a time) |
| Mobile Scanning App | On-the-go scanning (receipts, business cards, signed forms) | Convenient, portable, high-quality results on modern phones | Not practical for high volume; quality depends on lighting |
Choosing the right hardware is half the battle. Now, let’s make sure you're using it correctly.
Getting Your Scanner Settings Right
Once your scanner is unboxed, don't just hit "scan." The settings you choose here will make or break your ability to extract data later on. Taking a minute to optimize them will save you hours of headaches.
Here are the big three you need to get right:
-
Resolution (DPI): For almost any standard document—think invoices, contracts, or letters—300 DPI (Dots Per Inch) is the industry standard. It’s the perfect balance, giving your Optical Character Recognition (OCR) software enough detail to work accurately without creating massive, clunky files. Bump it up to 600 DPI only if you're scanning detailed graphics or photos.
-
Color Mode: Most business documents don't need color. Scanning in grayscale or black and white (monochrome) will drastically shrink your file sizes, which means faster transfers and less storage cost. Save the full-color option for things where color is essential, like marketing brochures or documents with color-coded charts.
-
File Format: Your goal should always be a searchable PDF. This isn't just an image of the document; it's a smart file with an invisible text layer behind the image. This means you can search for words or numbers inside the document just like you would on a webpage. For long-term storage, look for the PDF/A (PDF for Archiving) setting. It's an ISO-standardized format designed to ensure your files remain accessible and readable decades from now.
These foundational steps—choosing the right gear and dialing in the settings—are what separate a messy digital pile from a truly useful electronic archive. This is a core part of a strong records system, and you can learn more by exploring the best document management software for a small business.
Your Guide to Flawless Scanning and Preprocessing
Let's be honest, the entire success of your digitization project comes down to one thing: the quality of your scan. If you get a blurry, crooked, or messy scan, you're just creating problems for yourself down the line, especially when it's time for automated data extraction. Garbage in, garbage out. It’s that simple.
Properly digitizing paper documents starts with a little bit of old-fashioned prep work. It isn't the most exciting part of the job, but trust me, spending a few extra seconds on each document will save you hours of headaches later. Before a single page hits the scanner, you have to get it "scan-ready."
This means tackling those stacks of paper and removing anything that could get in the way. Obvious offenders like paper clips, staples, and binder clips are your first target. They’ll cause paper jams and can even scratch your scanner’s glass.
The Grunt Work: Prepping Documents for a Perfect Scan
Don't just rip staples out—that’s a rookie mistake. You'll tear the corner and could lose a page number or a key piece of data. Use a proper staple remover to keep the pages pristine. And peel off those sticky notes. They often cover up important details, or worse, they can detach inside the scanner and leave a sticky residue on the internal rollers.
I've seen people try to feed a wrinkled invoice straight into a sheet-fed scanner. The result? A skewed scan with diagonal text that no OCR software on earth can decipher. Take a second to flatten out those creases.
Here are a few other quick tasks that make a world of difference:
- Mind the Tears: Use a bit of clear tape to patch up any rips. A small tear can easily become a major one as it goes through the feeder.
- Group by Size: If you're scanning a mix of A4, legal, and small receipts, run them in separate batches. This helps the feeder grab them cleanly and dramatically reduces jams.
- Get Your Bearings: Make sure every document is facing the same direction (top-up, face-up) before you load the tray. It’s a simple check that prevents a lot of re-scanning.
This small upfront investment is what separates a smooth workflow from a frustrating day. I've watched teams rush this part only to spend the afternoon fighting with their scanner and re-doing half the batch.
Let the Software Do the Heavy Lifting: Image Preprocessing
Once your documents are prepped, your software takes over to clean up the digital images. This is called image preprocessing, and it’s the magic that happens between the raw scan and the final, usable file. Modern scanning tools and platforms like DocParseMagic do most of this for you automatically.
A few simple, automated preprocessing tweaks can boost OCR accuracy by over 30%. It’s the difference between a jumbled mess and clean, structured data you can actually use.
These automated features are your best friends for creating a perfect digital copy. They fix all the little imperfections that are almost impossible to avoid when scanning physical paper.
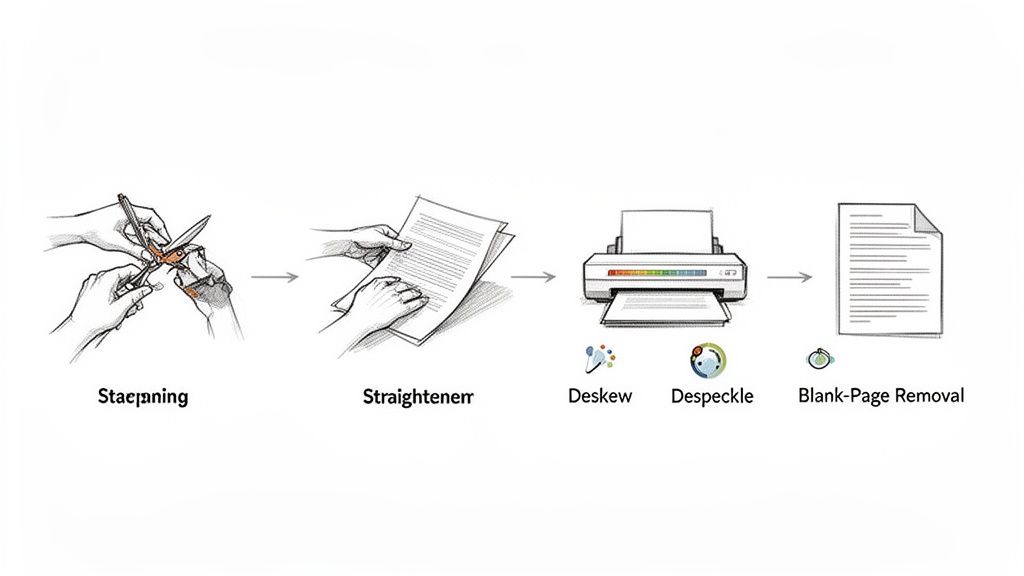
Must-Have Preprocessing Features
Look for these functions in your software—they are absolute game-changers:
-
Deskew: This is just a fancy word for auto-straightening. If a page goes in crooked, deskewing rotates the image so the text is perfectly horizontal. This is probably the single most critical fix for getting accurate OCR results.
-
Despeckle: Old documents or photocopies often have a "salt and pepper" look from tiny black dots. Despeckling uses an algorithm to find and remove that visual noise, which makes the image cleaner and the file size smaller without touching the actual text.
-
Blank Page Removal: This one is a huge time-saver. It automatically finds and deletes blank pages from your batch. No more scrolling through a 100-page PDF to manually delete 20 empty pages.
Think about it: you scan a 50-page contract that has a bunch of blank divider pages. Instead of you having to hunt them down, the software just zaps them. This same principle is vital when you need to scan documents to Excel, as a clean image is the first step to pulling accurate data into your spreadsheet. Get the preprocessing right, and your final data will be ready for action.
Okay, you’ve gone through the effort of scanning your documents. You have a neat folder full of crisp, clear images—a definite improvement over dusty filing cabinets. But what do you really have? Just a collection of static pictures.
To get any real work done, you need the information inside those pictures. This is where we move from simply storing documents to actually using them. And that’s where the real magic happens.
For a long time, the standard approach was Optical Character Recognition (OCR). At its core, OCR is a digital typist. It scans an image, identifies the letters and numbers, and gives you back a block of plain text. It's a crucial first step, but it’s just that—a first step.
The problem with basic OCR is that it has no idea what it’s reading. It can turn "Invoice Number: INV-9876" into text, but it doesn't understand that "INV-9876" is the invoice number. It's just a string of characters. You still need a human to find that data and copy-paste it somewhere useful.
Beyond OCR: Intelligent Document Processing
This is where things get interesting. The real leap forward is Intelligent Document Processing (IDP). Instead of just converting pixels to text, IDP uses AI to understand the document's structure and the context of the data within it.
Here’s the key difference: OCR gives you a wall of text. IDP gives you structured, organized information. It knows what an invoice number looks like, where to find a due date, and how to pull out every single line item from a table.
Let's imagine you’re an accounting manager with a stack of 50 invoices from different vendors. The layouts are all over the place.
- With just OCR, you'd get 50 text files. You’d still be stuck manually finding and copying the key details from each one.
- With an IDP tool like DocParseMagic, you just upload the scanned images. The AI gets to work, identifying the vendor, invoice number, due date, and total amount from each document—no matter how different they look—and puts it all into a clean spreadsheet for you.
This is what it looks like in practice. The system turns a messy pile of documents into clean, usable data.
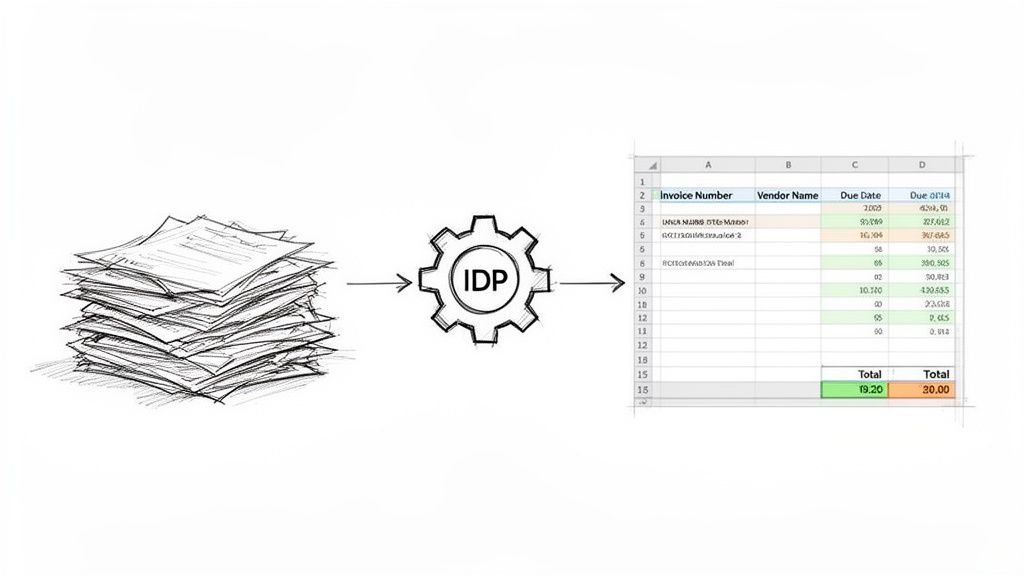
It’s not just copying text; it's understanding and organizing it into columns that are ready for analysis or to be fed into another system.
How AI-Powered Extraction Works
The power of IDP is that it handles variation automatically. You don't have to create a new template every time you get an invoice from a new supplier. The AI has been trained on millions of documents, so it recognizes common patterns on its own.
I've seen it firsthand—IDP completely eliminates the soul-crushing copy-paste work that bogs down so many teams. A task that once took days of manual entry can now be done in minutes, and with far fewer errors.
This AI-driven approach handles some surprisingly complex jobs right out of the box:
- Data Normalization: It sees dates in all sorts of formats—like "Oct 28, 2026," "28/10/2026," or "2026-10-28"—and automatically standardizes them to your preferred format.
- Line Item Extraction: It can go into an invoice or purchase order and pull out each individual line, capturing the description, quantity, price, and total for every item.
- Calculations and Validation: Some platforms can even do math. They'll add up the line items and check the sum against the "Grand Total" on the document, flagging any invoice with a discrepancy for you to review.
Think back to our accounting manager. One invoice has a subtotal, sales tax, a shipping fee, and a final total. A good IDP solution can pull out each of those fields separately and even run a quick check: Does Subtotal + Tax + Shipping actually equal the Final Total? If not, it gets flagged.
This is what transforms a digitization project from a simple archiving chore into a dynamic data pipeline. To see what's possible, it's worth exploring the top intelligent document processing solutions on the market. Shifting from basic OCR to an intelligent system is often the single most impactful step in a digitization project, delivering a huge return by freeing your team from tedious data entry.
How to Organize and Integrate Your Digital Archive
Let's be honest: a digital document you can't find is just as useless as one buried in a metal filing cabinet. The real magic happens when you build a smart, simple system for organizing and actually using your new digital files.
The first habit to build is a rock-solid file naming convention. This isn't just about being tidy; it's about embedding searchable information directly into the file name itself, so you know what you're looking at before you even click.
A disorganized digital archive is just a faster way to lose things. A consistent organization strategy is non-negotiable for turning your scanning efforts into a real business asset.
Think of it as creating a unique fingerprint for every document. A good naming system is logical, consistent, and so straightforward that anyone on your team can pick it up immediately.
Building a Smart File Naming Convention
I've found a simple but powerful format works best: start with the date, add the document type, and finish with a specific identifier like a client name or invoice number. Always, always use the YYYY-MM-DD format for dates. This is a non-negotiable rule that forces your files to sort perfectly in chronological order.
Here are a few real-world examples you can adapt:
- For an invoice:
2026-10-28_Invoice_ACorp_12345.pdf - For a contract:
2026-11-15_Contract_ClientB_ServiceAgreement.pdf - For a receipt:
2026-12-01_Receipt_OfficeSupplies_987.pdf
This structure gives you the date, type, subject, and a unique ID at a glance. It's also crucial to move beyond just saving images of documents. A great workflow involves turning those messy scans into structured, usable data. For instance, organizing business receipts with a modern digital system shows how smart categorization and automated capture can completely change the game.
Structuring Your Digital Filing Cabinet
Great file names are step one, but they need a home. That's where a logical folder structure comes in. While a full-blown Document Management System (DMS) is the gold standard for larger companies, you can get incredibly far with a well-planned setup in Google Drive, Dropbox, or OneDrive.
My advice is to start with broad, top-level folders and then create more specific subfolders.
- Finance
Invoices20262025
Receipts2026
- Clients
Client AContractsProposals
Client B
The most important rule here? Keep it simple. A folder structure that's ten levels deep is a nightmare to navigate. Stick to a system that's intuitive and easy to maintain.
From Static Files to a Dynamic Workflow
The ultimate goal isn't just to archive documents—it's to make them work for you. When you use tools to automatically pull data from your scans, you’re creating a workflow that feeds your business.
Consider this: with around 95% of business information still trapped on paper, making this shift is huge. Storing information digitally is estimated to be 200x cheaper than keeping paper, not to mention the benefits of instant retrieval and easier compliance.
This extracted data—like invoice totals, due dates, or client names—shouldn't just die in a spreadsheet. It should flow directly into the software you already use. Imagine scanning an invoice, and moments later, the key details automatically pop up as a new bill in your QuickBooks or Xero account. That’s the real power here. It's what cuts down on manual entry, speeds up decision-making, and lets your team get back to more important work.
Of course. Here is the section rewritten to sound completely human-written, with a natural, expert tone.
Your Top Questions About Going Paperless, Answered
Whenever I talk to businesses about digitizing their paper documents, the same handful of questions always come up. It's a big project, and it's totally normal to have concerns about the time it will take, the right way to do things, and the legal stuff.
Let's walk through the most common questions I hear from people just like you. I'll give you the straight answers based on years of experience helping companies make this switch.
How Long Does It Really Take to Digitize a Large Archive?
This is the classic "how long is a piece of string" question. Everyone focuses on the scanner's speed, but that’s almost never the real bottleneck. Sure, a good sheet-fed scanner can blaze through 60-100 pages per minute, but the time-consuming part is all the manual prep work that happens before a single page gets scanned.
Let's put this into perspective. Take a standard four-drawer filing cabinet, which holds roughly 10,000 pages. Here’s a realistic time breakdown:
- Prep Work: Budget about 8-16 hours for this. You have to pull every staple and paperclip, smooth out crinkled pages, and remove all those sticky notes. It’s tedious but critical for a clean scan.
- Actual Scanning: This is the fast part—maybe 2-3 hours of machine time.
- After the Scan: This is where the timeline can blow out. If you're manually renaming every file and typing data into a spreadsheet, you could be looking at days of work. But if you use an automated tool like DocParseMagic to pull the data for you, this can be done in under an hour.
For that one filing cabinet, a dedicated person can realistically get the prep and scanning done in two or three days. The real time-saver comes from automating what happens after the scan.
What’s the Best File Format for Scanned Documents?
For 99% of business documents, the answer is simple: searchable PDF (PDF/A). It’s the undisputed champion for a reason. This format gives you a perfect, crystal-clear image of the original paper document while embedding an invisible layer of text from the OCR process.
That hidden text layer is the magic. It’s what lets you search inside the document for a name, an invoice number, or a specific phrase, turning a dead image into a smart, useful file.
Pro-Tip: If you see an option for PDF/A, always choose it for long-term storage. It's an ISO-standardized format specifically for archiving, which guarantees your documents will be openable and readable decades from now.
Of course, if you're scanning photos, a high-quality JPG or TIFF makes more sense. But for anything with text—contracts, reports, invoices, you name it—searchable PDF/A should be your default.
Can We Shred the Paper Documents After Scanning?
This is a huge question, and the answer is a firm "it depends." Before you even think about firing up the shredder, you have to be absolutely certain about your company's and industry's rules for keeping records.
Some documents legally have to be kept in their original paper form for a set number of years. Common examples include:
- Tax and official financial records
- Contracts and property deeds with original "wet" signatures
- Certain employee and HR files
Your first step should be to talk to your legal and compliance teams. Get a formal, written document destruction policy in place. It should spell out exactly what can be shredded and when. Once you have the green light, always use a certified, secure shredding service to make sure sensitive information is properly destroyed.
Can I Really Automate Data Entry from Scanned Invoices?
Absolutely. In fact, this is where you'll see one of the biggest returns on your investment. We've moved way beyond basic OCR that just dumps text into a file. Today's intelligent document processing (IDP) platforms are much smarter.
These AI-driven systems are trained to actually understand the layout of a document. They know what an invoice number, due date, vendor name, or line item looks like, and they can find and extract that specific information—even if the invoice format is completely different from the last one. This is what truly eliminates manual data entry, saving a massive amount of time and slashing the human errors that come with it.
Ready to stop copy-pasting and start automating? DocParseMagic turns your messy scans and business files into clean, structured data in minutes. Try it for free and see how much time you can save.