PDF to Google Sheets A Practical Conversion Guide
Getting data from a PDF into Google Sheets can feel like a chore, but it doesn't have to be. The best approach really depends on the type of PDF you're working with. If you have a clean, digital PDF, a quick conversion to a CSV file is usually the fastest way to go. But for scanned paper documents, your best bet is to use Google Drive’s built-in Optical Character Recognition (OCR), which cleverly turns images of text into actual, editable text.
Why Manual Data Entry From PDFs Is a Thing of the Past
We've all been there—hunched over a screen, manually typing numbers from an invoice or a bank statement into a spreadsheet. It's tedious, mind-numbing, and a perfect recipe for mistakes. That data is essentially locked inside the PDF, and freeing it feels like a waste of a good afternoon.
But that whole process is completely outdated. This guide is all about showing you how to get that data out, the smart way. We’ll start with the simple, built-in tools Google Drive offers for those one-off tasks. Then, we’ll get into more advanced methods for handling tricky scanned documents and even set up automated systems that do the work for you.
By the time you're done reading, you'll know exactly which tool to grab for any situation, whether you’re converting a single PDF or overhauling your entire team's workflow.
The Scale of the Problem
This isn't just a minor annoyance; it's a huge operational hurdle for countless businesses. Think about it: experts estimate that we create over 2.5 billion new PDFs every single year. That’s a mountain of static information just waiting to be put to use. The demand for pdf to google sheets conversion is especially high in places like North America and the EU, where companies are pushing hard to automate their internal processes.
With that kind of volume, trying to keep up manually is a losing battle. It’s not just slow—it's unsustainable. A single misplaced decimal or a typo in a client ID can cascade into reporting errors, late payments, and bad business intelligence.
This isn't just about saving a few minutes. It's about protecting the integrity of your data. Every time someone types something in by hand, there's a chance for error. Automation removes that risk right at the source, giving you cleaner, more reliable data from the start.
Embracing Modern Solutions
The good news? Technology has already solved this problem. The move away from manual work is well underway, thanks to powerful and accessible strategies to automate data entry that are no longer just for big corporations.
Today, anyone can access tools that were once considered enterprise-grade.
- Built-in OCR: Google Drive can read the text in your scanned documents automatically. No extra software needed.
- Direct Exporting: Many modern tools can pull data from digital PDFs and convert it into a perfectly formatted spreadsheet file.
- Workflow Automation: You can now use platforms that watch a folder for new PDFs, extract the key information, and plug it right into your Google Sheet, all without you lifting a finger.
These solutions are no longer out of reach. For any team looking to work smarter, not harder, manually copying data from a PDF is officially obsolete.
Simple Conversion Methods for Everyday Use
When you only need to pull data from a PDF once in a while, there’s no need to shell out for specialized software. A couple of surprisingly powerful and free methods can handle most day-to-day conversion tasks. These are perfect for those one-off reports or simple invoices you just need to get into a spreadsheet for analysis.
The best approach really depends on what kind of PDF you’re working with. Is it a document that was born digital, or is it a scan of a physical piece of paper? Each type has a go-to solution that gets the job done without much fuss.
Use Google Drive for Scanned Documents
One of the most useful—and often forgotten—tools in the Google ecosystem is the Optical Character Recognition (OCR) built right into Google Drive. This is your secret weapon for turning paper documents into usable data. It’s designed to read text from images and scanned PDFs.
Imagine you have a scanned printout of a sales report. Instead of manually re-typing everything, you can let Google do the heavy lifting. The whole process is incredibly simple.
Here’s how it works:
- First, just upload your scanned PDF to your Google Drive.
- Next, right-click on the file, hover over "Open with," and choose "Google Docs."
- That's it. Google Drive processes the file, uses its OCR magic to read the text and tables, and then opens it as a brand-new, editable Google Doc.
This one action kicks off a powerful background process, transforming a static image of a document into live, editable text. From there, you can just copy the table out of the Google Doc and paste it directly into your Google Sheet. It’s not always flawless, but for basic layouts, it’s often shockingly accurate.
Export to CSV for Digital PDFs
But what if your PDF wasn't scanned? For digitally native PDFs—the kind generated by accounting software or downloaded from a website—there’s an even cleaner route. These files already contain real, selectable text, so you don't need OCR. The trick here is to convert the PDF into a Comma-Separated Values (CSV) file.
A CSV is a plain-text format that Google Sheets understands perfectly. This method is far more reliable for preserving the table structure than a simple copy-and-paste job.
You have a couple of solid options for this:
- Adobe Acrobat: If you have a paid subscription, the "Export PDF" tool lets you save the file directly as a CSV. It's fast and reliable.
- Online Converters: Plenty of free web-based tools are out there that do one thing: convert PDFs. Just upload your file, select CSV as the output, and download the converted document.
Once you have your CSV, getting it into Google Sheets is a breeze. Just open a new Sheet, go to File > Import > Upload, and select your file. Google Sheets will automatically parse the data into neat columns and rows. For a more detailed walkthrough, our guide on how to convert a PDF to a CSV file covers more tools and tips.
Pro Tip: After importing a CSV, always give your data a quick sanity check. I’ve seen dates and currency figures import as plain text countless times. You can fix this in seconds by selecting the column and using the "Format" menu in Google Sheets to set the correct data type.
Which Simple Method Should You Choose?
So, how do you decide? It all comes down to where your PDF came from. Neither method is better; they’re just built for different starting points.
| Method | Best For | Why It Works Well |
|---|---|---|
| Google Drive OCR | Scanned paper documents, photos of text, or image-based PDFs. | It's brilliant at recognizing characters from an image, turning a static picture of a document into editable text you can work with. |
| Export to CSV | Digitally created PDFs like software reports or online statements. | It keeps the original data structure perfectly intact, which means a clean, accurate import into your spreadsheet. |
By picking the right tool for the job, you can turn what feels like a tedious data entry task into a quick, two-minute process. For those occasional conversions, these methods are often all you need.
Dealing with Scanned and Messy PDFs
Let's be honest: converting a clean, digitally-created PDF to Google Sheets is the easy part. The real headaches begin when you're staring at a blurry scan, a photo of a receipt, or a PDF with a tangled, multi-column layout. This is where simple copy-paste or a basic CSV export will leave you with a chaotic jumble of text and hours of manual data entry.
Success with these tricky documents all comes down to a technology called Optical Character Recognition (OCR). In a nutshell, OCR software scans an image of a document and turns the shapes it sees into actual, editable text. The quality of that OCR engine is the single biggest factor that determines whether you get a usable spreadsheet or a garbled mess.
Getting Your Scans Ready for Prime Time
Before you even think about uploading a scanned document, a few simple tweaks can make a massive difference in your results. It’s like adjusting the lighting before taking a photo—a little prep work pays off big time. These "pre-processing" steps can easily be the difference between 70% and 95% accuracy.
One of the most common culprits is a low-contrast scan, where the text is faint and just melts into the background. You don't need fancy software to fix this.
- Pump Up the Contrast: Use a free online photo editor or the built-in tools on your computer to increase the contrast. This makes the text pop and gives the OCR engine a much cleaner shot at reading everything correctly.
- Straighten Things Out: Was the document scanned at a slight angle? Most OCR tools get confused by tilted text. Look for a "straighten" or "deskew" function to get everything aligned horizontally.
- Crop Out the Noise: See a coffee stain, a handwritten note, or a company logo in the margins? Crop the image to focus only on the table or data you actually need. This stops the OCR from getting distracted by irrelevant junk.
These small adjustments help the software zero in on what matters: the characters that make up your data. For more on this, check out our guide on how to convert scanned documents to Excel, as the same principles apply perfectly to Google Sheets.
When Standard OCR Just Won't Cut It
Even with a crystal-clear scan, basic OCR can get tripped up by complex tables, merged cells, or weird layouts. The software might recognize all the text perfectly but completely fail to understand the structure, smashing columns together or misplacing headers. This is where you need to bring in the heavy hitters.
Intelligent Document Processing (IDP) is the next step up from OCR. Instead of just seeing characters, IDP uses AI to understand the context and structure of a document. It can pinpoint specific fields like 'Invoice Number' or 'Total Amount,' no matter where they are on the page.
IDP platforms are designed for situations where data accuracy is absolutely critical. A simple OCR tool might get you in the ballpark, but these advanced systems can deliver results that are practically flawless.
The accuracy gap is huge. While converting a simple digital PDF to CSV can give you over 98% accuracy, scanned documents rarely hit that mark with basic tools. In contrast, AI-powered IDP platforms have made incredible progress. Some vendors report extraction accuracy above 99.9% on structured documents using pre-trained AI models. You can dig into these powerful data extraction benchmarks on Docsumo.com. This is the level of precision that makes automated workflows for finance and bookkeeping teams not just a nice idea, but a reliable reality.
How To Automate Your PDF To Sheets Workflow
Handling one or two PDFs manually is fine, but what happens when you’re dealing with dozens or even hundreds of them every month? It becomes a massive time-sink. Think of a finance team manually punching in numbers from vendor invoices or an HR team copying data from expense reports. This is where a hands-off, automated system stops being a nice-to-have and becomes a business necessity.
The idea is to build a workflow that just runs. It grabs data from a PDF and puts it straight into a Google Sheet without anyone needing to click a thing. This frees your team from the drudgery of copy-pasting so they can focus on work that actually matters.
Building Your Automated Pipeline
An automated workflow is really just about connecting your favorite apps so they can talk to each other. It’s like a digital assembly line: a new document comes in, gets processed at a few different stops, and the clean data pops out the other end, neatly organized in your spreadsheet.
The main tools for the job are workflow automation platforms like Zapier or Make. They act as the glue between your apps—like your email, cloud storage, and a document parsing tool. You set up simple rules, or "zaps," that follow a basic "when this happens, do that" logic.
Let's walk through a real-world example.
Say your accounts payable team gets vendor invoices as email attachments. The old way involves someone opening every single email, downloading the PDF, hunting for the important details, and then typing them into a Google Sheet. It’s slow, tedious, and mistakes are bound to happen.
Here’s what an automated workflow looks like instead:
- The Trigger: A new email with an attachment lands in a dedicated inbox (like invoices@yourcompany.com).
- The First Action: Zapier sees the new email and immediately sends the PDF attachment over to an Intelligent Document Processing (IDP) tool, such as DocParseMagic.
- The Second Action: The IDP tool, which you've already taught to recognize your invoice layout, pulls out the exact fields you need—invoice number, vendor name, total amount, due date, etc.
- The Final Action: This extracted data is then sent to Google Sheets, where Zapier adds it as a perfectly formatted new row in your finance tracker.
This whole process happens in seconds, 24/7, with zero human intervention.
The Power of Intelligent Document Processing
While a tool like Zapier directs the traffic, the real magic is in the data extraction. This is where specialized IDP tools are a game-changer. They do much more than basic OCR; they use AI to actually understand the document's layout and context. This ensures the data you pull is consistently accurate.
For really slick automation, you’ll want to look at AI tools with powerful integrations, like Fastbots.ai's Zapier integration for uploading documents. These tools are built to plug right into the kind of automated pipeline we’re discussing, handling all the heavy lifting of document analysis. You can learn more about the basics of setting up these systems in our guide on how to automate data entry.
This flowchart shows how a document travels from its raw state—whether it's a clean digital file or a messy scan—to becoming structured, useful data.
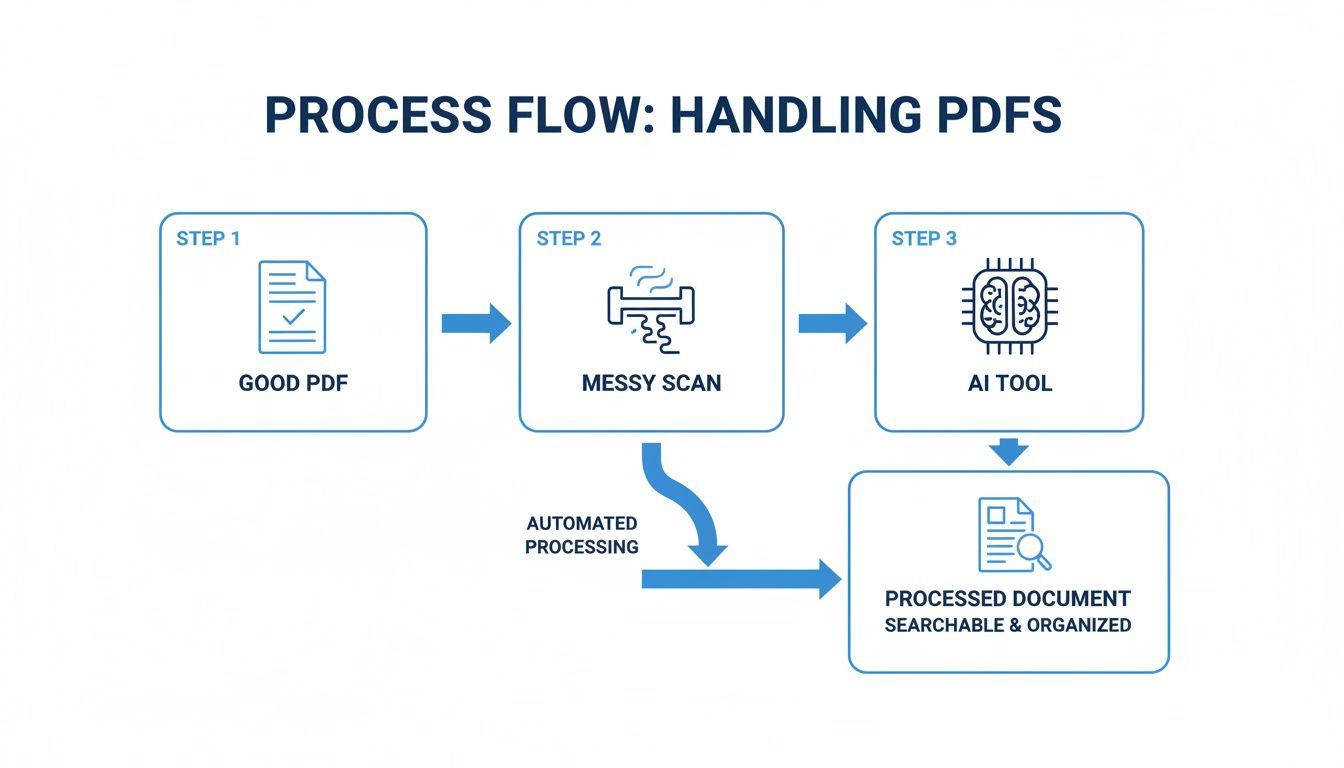
As you can see, no matter if the PDF is pristine or a bit challenging, the right AI-powered tool is what turns it into something your spreadsheets can actually use.
Setting Up Validation for Data You Can Trust
A truly great automated workflow doesn't just shuffle data around—it checks it. What if an invoice shows up with a missing due date? Or a total that looks way too low? A smart system should catch these problems before they poison your dataset.
This is where you build a validation step into your automation. For instance, you can configure your workflow to:
- Check for Missing Fields: If the "Total Amount" field is empty, the system can flag it for a human to review instead of just adding a blank cell to your sheet.
- Verify Data Formats: You can enforce rules to make sure dates always appear in
YYYY-MM-DDformat or that invoice numbers are purely alphanumeric. - Apply Business Rules: You could set a rule that if any invoice total is over $10,000, it gets automatically routed to a manager for approval before being added to the main spreadsheet.
These simple checks act as a safety net. They make sure the data hitting your Google Sheets is not only fast but also accurate and in line with your company’s rules.
By building in these simple validation steps, you transform your workflow from a simple data-entry bot into an intelligent assistant. It catches potential problems early, saving you from much bigger headaches down the road.
The business impact here is huge. When you quantify the value of automating PDF-to-Sheets conversions, the productivity gains are undeniable. Industry benchmarks show that processing an invoice manually takes anywhere from 5 to 15 minutes. With automation, that drops to less than a minute. That’s a time saving of around 80–90% per document.
For a team processing 2,000 invoices a month, those savings add up to thousands of hours of reclaimed time every year. It’s not just about being more efficient; it's about changing how your team works, freeing them from mind-numbing tasks so they can contribute in more meaningful ways.
Cleaning And Troubleshooting Your Data In Google Sheets
Getting your data out of a PDF and into Google Sheets is a huge win, but let's be real—the job isn't done yet. More often than not, the raw data that lands in your spreadsheet is a little... messy. This is completely normal, especially when you're dealing with scanned documents or PDFs with tricky layouts.
Think of this next step as the final polish. It’s where you turn a chaotic jumble of text and numbers into a clean, reliable dataset you can actually trust for analysis or reporting. If you skip this part, you're running the risk of making decisions based on faulty information.
Fixing Numbers That Act Like Text
One of the most common headaches is seeing numbers show up as plain text. You’ll know this is the problem when your SUM() formula stubbornly returns a big fat zero, even though you're looking at a column full of numbers. It’s because Google Sheets sees "1,250" as text, not a value it can add up.
Look for a tiny green triangle in the corner of the cell—that’s Sheets’ little warning sign that something’s off. Thankfully, the fix is simple: the =VALUE() function. It’s built for this exact job.
If cell A2 has the text "1,250.75", just pop =VALUE(A2) into another cell. Boom. You now have a real number. From there, you can just drag that formula down the entire column to fix everything in one go.
Getting Rid of Pesky Extra Spaces
Invisible extra spaces are the silent killers of clean data. A stray space at the beginning or end of a cell—what we call a leading or trailing space—can completely break your VLOOKUPs and mess with sorting. You can’t even see it, but Google Sheets treats "Client Name " and "Client Name" as two totally different things.
This is where =TRIM() becomes your best friend. It automatically zaps all those extra spaces from the beginning and end of a cell’s text.
Let's say you have a list of names in column B riddled with bad spacing.
- In an empty column next to it, type the formula
=TRIM(B2). - Drag that little blue square at the corner of the cell all the way down.
- Now, just copy your new, clean column and use Paste special > Values only to put it back over the old, messy data.
This one function can save you from hours of manual, mind-numbing cleanup.
Splitting Merged Data Into Separate Columns
PDF conversions sometimes get lazy and cram everything into one cell. You might end up with a full address in a single column when what you really need is "Street," "City," and "Zip Code" in their own columns for filtering.
The =SPLIT() function is perfect for this. It takes the text from one cell and breaks it into several columns based on a "delimiter" you choose, like a comma or a space.
For instance, if cell C2 contains "Doe, John", the formula
=SPLIT(C2, ", ")will put "Doe" in the current cell and automatically pop "John" into the cell to its right. It’s a fantastic way to restructure data without endless copy-pasting.
For more control, you can also go to the Data menu and select Split text to columns. This opens up a handy little tool that lets you pick your delimiter and see a preview before you commit, which is great for one-off tasks.
Advanced Cleanup with Find and Replace
When you're facing a consistent error across your entire sheet—like a rogue currency symbol or a recurring typo—the "Find and Replace" tool is an absolute lifesaver. Just hit Ctrl + H (or Cmd + H on a Mac) to bring it up.
This tool is more powerful than you might think. You can use it to:
- Remove Unwanted Characters: Did all your product codes import with an extra hyphen, like "SKU-123-"? Just find "-" and replace it with nothing. All gone.
- Standardize Data: Quickly change every instance of "United States" or "U.S." to a consistent "USA."
- Fix Date Formats: If your dates look like "01.15.2024", you can find all the periods "." and replace them with slashes "/" before applying the proper date format.
With a little creativity, Find and Replace becomes a powerful bulk-editing tool. You can enforce consistency across thousands of rows in a few clicks, making sure your data is uniform and ready for whatever you need to do with it.
Got Questions? We've Got Answers
When you're trying to pull data out of PDFs and get it into Google Sheets, a few common roadblocks always seem to pop up. Let's tackle some of the most frequent questions I hear from people wrestling with this process.
Can I actually get handwriting from a scanned PDF into Google Sheets?
The short answer is yes, but you need to set your expectations. Your standard, run-of-the-mill OCR tool is built for clean, printed text and will make a complete mess of handwriting. It just wasn't designed for it.
To even have a shot at this, you'll need a more sophisticated, AI-powered service that has been specifically trained on handwritten text. Even then, the success rate comes down to one simple thing: how neat is the handwriting? No matter what tool you use, always budget time for a human to review and clean up the results, especially if it's important data.
What's the best way to handle a PDF with multiple tables on a single page?
Ah, the classic nightmare scenario. This is where most basic converters completely fall apart. If you try a simple copy-paste or a basic OCR tool, you'll likely end up with data from all the tables jumbled together into one unusable spreadsheet.
The only reliable way to handle this is with a proper Intelligent Document Processing (IDP) tool. These platforms let you physically draw a box around each table on the PDF page. You can then tell the software exactly where to put the data from each specific box in your Google Sheet. This keeps everything organized and structured correctly.
My Two Cents: For any PDF with a complex layout—multiple tables, sidebars, you name it—a tool that lets you define extraction zones is a must-have. It’s the only way you'll get a clean import without pulling your hair out.
Is it safe to upload sensitive PDFs to random online converter sites?
This is a huge one. When you're dealing with invoices, bank statements, or any personal client data, security has to be your number one concern. My advice is simple: never, ever use free, anonymous online converter websites for sensitive documents. You just don't know where that data is going.
Instead, stick with trusted, professional-grade platforms that are upfront about their security policies. Look for things like GDPR or SOC 2 compliance—it shows they take security seriously. For the absolute highest level of security, use a method that keeps your data within your own ecosystem, like the OCR feature built into your Google Drive or a trusted desktop application like Adobe Acrobat.
Why does my converted text look like gibberish or have weird symbols?
This is almost always an encoding problem. It’s what happens when the converter can’t properly read the character set in the original PDF and just guesses, leading to scrambled text. This used to be a much more common headache, but modern tools have gotten a lot smarter.
Honestly, the fastest fix is to just try a different, better tool. A quality OCR engine or a dedicated IDP service like the ones we've discussed will usually detect the right encoding automatically and give you clean, readable text right out of the gate.
Ready to stop wrestling with messy documents and automate your data entry? DocParseMagic turns your PDFs into clean, structured data in Google Sheets without any manual work. Get started for free and see how it works.