Convert Scanned Documents to Excel An Expert Guide
Let’s be honest, manually keying in data from scanned documents to an Excel sheet is a soul-crushing task. It's a huge bottleneck that almost always leads to costly mistakes and hours of wasted effort. For any team drowning in invoices or reports, every minute spent on tedious data entry is a minute they can't get back.
Automating this whole process isn't just a nice-to-have; it's the only real way to boost your team's efficiency and start making decisions based on real-time, accurate data.
Why Manual Data Entry Is Holding You Back

Picture your accounting team at month-end, staring at a mountain of scanned supplier invoices. Every single line item, date, and invoice total has to be meticulously typed into a spreadsheet. This isn't just boring; it's a massive drain on productivity and a perfect recipe for human error. One misplaced decimal point can throw off an entire financial report, leading to some seriously flawed business insights.
This scene plays out in offices everywhere, highlighting the real-world costs of sticking with old, inefficient methods. The time your team sinks into manual entry is time they could be spending on analysis, strategy, or other work that actually grows the business.
It’s no surprise that the demand for tools that can convert scanned documents to Excel is skyrocketing. Businesses are rushing to digitize their workflows to keep up. We're seeing industries from finance and logistics to education leading the charge, automating everything from complex financial reports to simple inventory lists.
The Hidden Costs of Inefficiency
The trouble with manual data entry goes way beyond just losing time. It creates a ripple effect of problems that can hit your business hard.
- Employee Burnout: Nobody enjoys doing repetitive, low-impact work. It's a fast track to burnout and low morale, which makes it tough to keep your best people around.
- Delayed Decisions: When crucial data is trapped in scanned PDFs, it can take days—or even weeks—to get the information you need to make important business calls.
- Growth Gridlock: There's a hard limit to how many documents a person can process by hand. As your business grows, this manual chokepoint will absolutely throttle your ability to scale.
The bottom line is this: manual data entry forces your skilled professionals to act like data-entry clerks, pulling them away from the valuable, high-impact work you hired them to do.
It’s time to move past this outdated model. If you want to dig deeper into this, check out our guide on how to automate data entry.
Getting Your Scans Ready for a Flawless Conversion
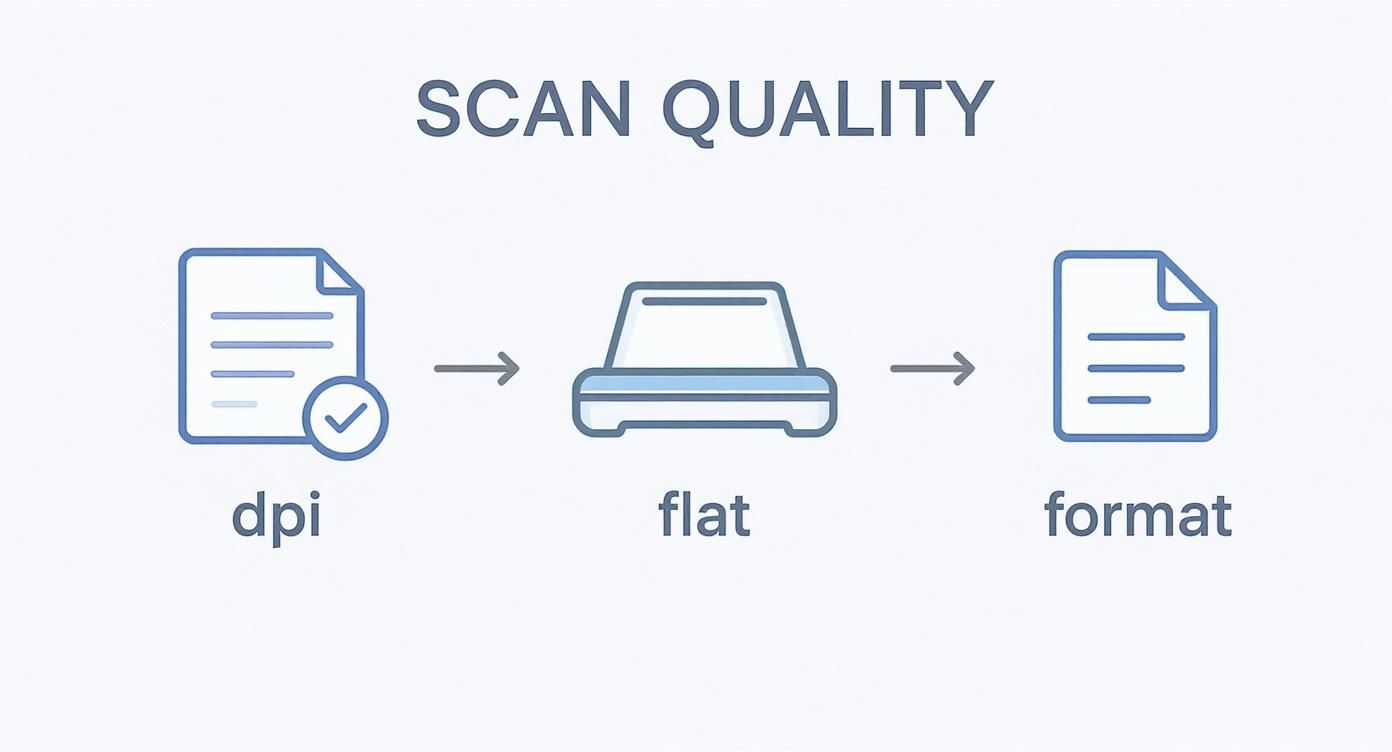
The success of your entire project hinges on one thing: the quality of the initial scan. This is where it all starts. Before you even think about uploading a file, you need to make sure you're giving the software the best possible source material to work with.
Think of it this way: "garbage in, garbage out." A blurry, crooked, or low-resolution scan will only lead to jumbled data and hours of headaches trying to fix it all manually.
Nail the Scan Settings From the Start
Your first and most important step is to set the right resolution. I always tell people to scan documents at a bare minimum of 300 Dots Per Inch (DPI). This is the sweet spot for clarity, giving the Optical Character Recognition (OCR) software a clean look at every character on the page.
If you go any lower, you're asking for trouble. The software can easily mistake similar characters—think confusing a "0" with an "O" or an "l" with a "1"—which can wreak havoc on your final spreadsheet.
Tweak Your Image Quality
Beyond just the DPI, how you physically scan the document matters a ton. Make sure the paper is perfectly flat against the scanner glass. Any wrinkles or lifted corners will create shadows and distortions that can hide text from the OCR engine. This is why I almost always prefer a flatbed scanner over a sheet-fed one for those really critical pages.
You'll also want to pick the right file format. JPEGs are everywhere, but their "lossy" compression can actually make the image quality worse over time. For the best results, stick with one of these:
- PDF: This is the go-to for a reason. It's perfect for documents with multiple pages and is supported everywhere.
- TIFF: If you need the absolute highest quality, TIFF is your answer. It uses "lossless" compression, meaning it keeps every single pixel of the original image data intact.
Today's OCR is a whole different ballgame thanks to AI. Modern tools can hit text recognition accuracy upwards of 99%, which drastically cuts down on the amount of time you have to spend fixing things. This is a lifesaver, especially when you're dealing with messy tables or handwritten notes.
This diagram shows how different pieces of the puzzle connect. That TWAIN standard it mentions is what allows your scanner and the software to talk to each other, making sure the image data gets where it needs to go without a hitch.
If you're curious about the mechanics behind all this, it's worth taking a moment to understand what OCR technology is and how it actually works.
A Practical Walkthrough Using DocParseMagic
Theory is great, but let's get our hands dirty. The best way to understand how to convert scanned documents to Excel is to walk through the process with a real tool. I'll show you how to do it using DocParseMagic, focusing not just on the "how" but the "why" behind each action.
First things first, you need to get your scanned document into the system. DocParseMagic keeps this simple with a drag-and-drop uploader. Once your file is loaded, the interface shows your document on one side, ready for you to tell it what data you're after. Let's say you're working with a 50-page supplier catalog; you can just flip straight to the page with the pricing table you need to pull.
Defining Your Data Extraction Template
This is where the real work—and the magic—happens. Instead of tediously copying and pasting, you simply draw a box around the entire table you want to capture. The tool's AI instantly gets to work, analyzing the structure and making an educated guess at the rows and columns.
Now, you fine-tune it. You can click on the column headers in the document—maybe they’re labeled ‘Product ID,’ ‘Description,’ and ‘Unit Price’—and the software is smart enough to map all the data underneath them. I've found this works great even on less-than-perfect scans. If you have a document with weird multi-line entries or a slightly skewed layout, you can just manually drag the row separators to make sure every single data point is lined up correctly.
Getting the template right is the key to getting consistent, accurate data every time you use it. It all starts with the quality of your scan.
As you can see, starting with a high-resolution scan (think 300 DPI or higher) in a solid format like PDF or TIFF is absolutely foundational. Garbage in, garbage out, as they say.
Previewing and Exporting Your Data
One of my favorite features is the real-time data preview. As you're building your template, a live table populates on the side of your screen. This is your chance to spot-check the results and catch any OCR errors or misaligned columns before you export.
Here's a pro tip I always follow: quickly scan a few sample rows in the preview. Look for those classic OCR mistakes, like the letter 'O' being mistaken for the number '0', or making sure that prices and quantities have their decimals in the right spot.
Once you’ve given it a final check and you're happy with how clean the data looks, just hit the ‘Export’ button. This generates a perfectly structured CSV or XLSX file, ready to be opened in Excel, Google Sheets, or whatever analysis tool you use.
And just like that, you’ve turned a static, un-editable image into a dynamic spreadsheet, all without a single minute of manual data entry.
Dealing With Complex Tables and Imperfect Scans
Let's be honest: real-world documents are messy. It’s one thing to work with a perfect, clean scan, but it's another thing entirely to deal with the skewed pages, coffee stains, and bizarre table formats you’ll actually encounter. This is where the real work begins.
We're moving beyond the basics to tackle the frustrating challenges that can trip up even the best OCR software. Think about an invoice where one line item stretches across multiple rows, or a report filled with merged cells. These common headaches require a smarter approach than a simple point-and-click extraction.
Taming Recurring Messy Documents With Templates
If you handle the same type of document over and over, templates are your best friend. Imagine getting a monthly sales report from a partner, and it always has the same skewed layout and a complex header. Instead of fixing the data selections every single time, you can fine-tune your extraction rules just once and save them.
The next month, just upload the new report, apply your saved template, and you’re done. With one click, the software knows exactly how to handle that quirky table and assign the columns correctly. This turns a repetitive, manual chore into a quick, automated task.
My advice is to create a specific template for each recurring document type you process. This small, upfront investment in setup pays massive dividends in time saved and accuracy gained over the long run, turning a painful monthly task into a routine, one-click process.
Using Data Validation Rules to Catch Errors Early
Another powerful technique is to set up data validation rules to automatically flag OCR mistakes before they cause problems. For example, let's say a specific column in your report should only contain numbers, like quantities or prices. Simple, right?
Within a tool like DocParseMagic, you can apply a rule to that column that flags any entry containing text. If the OCR misreads a "0" as an "O," the validation rule highlights the error right away. This kind of proactive error-checking ensures you catch mistakes before they ever land in your final Excel file, which dramatically improves the integrity of your data.
How to Clean and Format Your Data in Excel
Getting your scanned data into a spreadsheet is a huge first step, but the job isn't quite finished. Even the most advanced OCR tools can sometimes leave behind little quirks or formatting issues. The final, critical step is to give that raw data a quick cleanup, making it perfectly reliable for whatever you need to do next.
This is basically the quality control phase after you convert scanned documents to excel. You'll often run into small, predictable issues—things like extra spaces sneaking in, numbers being misread as text, or data from two separate columns getting squished into one.
Don't worry, you don't need to be an Excel wizard or write complicated macros. A few of Excel's built-in tools are more than powerful enough to handle these common hiccups.
Quick Fixes for Common OCR Errors
One of the most common issues I see pop up is funky spacing. The TRIM function is your absolute go-to for this. It instantly strips out any extra spaces before or after the text in a cell, tidying things up in a flash.
Another lifesaver is the 'Text to Columns' feature, found right in the Data tab. Let’s say your OCR tool merged "First Name" and "Last Name" into a single column. This tool lets you instantly split them back into two, using the space between them as the separator. It's incredibly useful. For a deeper dive into these techniques, check out our guide on data parsing in Excel.
A simple but powerful trick I use all the time is 'Find and Replace' (Ctrl+H). It's perfect for fixing widespread OCR mistakes, like if the letter 'O' was consistently mistaken for the number '0' in a list of product IDs. You can fix them all at once.
This final touch-up step is usually pretty fast. Modern OCR tools, especially those with AI, already slash document processing time by up to 70% and often hit 95-99% accuracy. That means you’re just doing a little polishing, not a major overhaul. You can read more about these efficiency gains at markdownconverters.com.
A Few Common Questions About Document Conversion
When you start diving into document conversion, a few questions pop up again and again, especially when you’re not starting with perfect, digitally-native files. Getting a handle on these will help you set the right expectations and nail your process when you convert scanned documents to excel. Let's walk through some of the most common things people ask.
Can I Convert Handwritten Documents to Excel?
This is a big one, and the honest answer is: it depends.
Success really hinges on two things: how clear the handwriting is and how smart your software is. Modern tools equipped with Intelligent Character Recognition (ICR) have become surprisingly adept at deciphering neat, block-letter handwriting. But if you're dealing with messy cursive or rushed notes, you're going to see a lot of errors. It's just the reality of the tech right now.
My advice? For any project involving handwritten data, always budget time for a human review and cleanup step after the initial conversion.
What's the Best File Format for Scanning?
If you're aiming for absolute perfection, a lossless TIFF file is the gold standard. It captures every single pixel without any compression, giving your software the most information to work with.
However, for most day-to-day work, a high-resolution PDF is far more practical. It strikes a great balance between quality and file size. Just make sure your scans are set to a minimum of 300 DPI (dots per inch). Anything less and you're compromising the clarity needed for accurate extraction. I'd steer clear of JPEGs entirely—the way they compress images can create little artifacts that throw off even the best OCR engines.
The real key here is consistency. Whether you go with PDF or TIFF, making sure every single scan is high-quality is the most critical factor for getting clean, reliable data.
How Do I Handle Multiple Tables on One Page?
This comes up all the time with things like financial statements or dense inventory lists. You've got two, maybe three distinct tables on a single page, and you need to keep them separate.
Most professional-grade tools solve this by letting you define specific extraction zones. Instead of telling the software to read the whole page, you simply draw a box around the first table you want. Extract that data, then draw another box around the second table. This targeted approach is the only way to prevent the software from jumbling all the data together into one big, unusable spreadsheet.
Ready to stop wrestling with messy scans and start getting clean, actionable data in seconds? DocParseMagic uses powerful AI to accurately extract information from any document directly into Excel. Try DocParseMagic for free and transform your workflow today!